Sunday, December 29, 2013

'Twas a Very Merry Christmas

I can hardly believe that Christmas has come & gone and we are nearing the end of another year.  I know you must hear this a lot but time really does seem to fly by.  I try to use my super brain power to slow it down, but for some reason (call it reality) it just doesn't work.  Oh well, at least we are having the time of our lives and enjoying each precious memory we get to make.  Speaking of special memories…our Christmas was chalk full of them!  It brings me so much joy to watch my kids faces light up as they open gifts and give each other gifts.  Christmas is such a magical time of year for kids and we are so blessed to be able to go a little nuts with the festivities.


 I absolutely love having 2 whole weeks of winter break to spend with my kiddos.  No schedules to keep, places we have to be or things that must be done.  Spontaneity rules during this time.  Sleeping in happens on a regular basis and staying in your pi's all day is the new gettin ready for the day.  My most favorite part is having the time to sit and build Lego's with my boys or play dolls with my girl.  Those are times I truly cherish.  What are you doing this winter break?  We definitely have plans to hit up the library and have many more movies to watch before the countdown to school begins.  Here's to hoping you are all enjoying this time of year and having a wonderful winter break!

~Trisha

Thursday, December 19, 2013

Snow Glad It's Almost Christmas!

Cheesy blog title, I know.  I simply cannot think about the perfect Christmas setting without thinking SNOW!!!  Unfortunately, I live in the Pacific Northwest where we don't typically see much of the glorious white stuff.  We do live quite close to several mountains where we can get our fix, but it's just not the same as waking up to it.  So, with a desire to see a magical white Christmas I have brought you the following images (just in case you won't be waking up to a White Christmas either).


Google Images
Google Images
Google Images
Google Images
Google Images
                                     
May these pictures bring you lots of cheer and warm, fuzzy feelings.  From my family to yours, 
Merry Christmas!

~Trisha


Thursday, December 5, 2013

Better Late than Never?

So as you may know, it's nearly Christmas (yay!) and yet I am just now getting around to my Thanksgiving post!  Completely unacceptable, I know.  To say the holidays have carried me away is an understatement.  I though I was completely prepared for the holiday season yet I've been swept up in all it's activities!  Oh well, at least I'm enjoying every minute of it.  A while back I wrote a post about a pre-Thanksgiving meal trial run and how it turned out.  My family eats gluten-free & mostly grain-free so sometimes the holidays can be challenging.  I wanted to "de-stress" our Thanksgiving by trying out a couple new recipes before hand.  One thing I didn't account for was the wonderful selection of holiday food items I would find at Whole Foods.  I've been making meals from scratch for so long that I forget that some stores might have some shortcuts available for me!  Because I bring most of the food & desserts for Thanksgiving, I wanted to infuse some semi-homemade dishes into my menu.  So off to Whole Foods Market I went!  Let me tell you that I want to live in that store!  The moment I walk in I am mesmerized…so many gluten-free food items to choose from!  All the produce & foods items look delectable…simply irresistible!  Anyways…my most important goal was finding a gluten-free stuffing mix that looked yummy & was easy to add my touch to without having to do all the work.


This is what I'm talking about!  Here is a shot of the box with a picture of the finished product.  It was incredible!  I loved every bite and so did everyone else.  The texture was right on and the flavor was delicious.  I cannot wait to make this again for Christmas.  The rest of the main meal consisted of roast turkey (prepared by my dad) and paleo mashed potatoes (you can find the info on those here).  Here is how everything turned out…


Now, doesn't this look yummy!  The best part…you won't feel like you need to be rolled away from the table and put to bed.  There wasn't an inch of gluten anywhere to be seen!  That makes for happy tummies!


 I hope all your Thanksgivings were filled with lots of delicious dishes and wonderful family & friends to share it with.


~Trisha

Tuesday, November 19, 2013

Christmas on my Mind


Hello and happy holiday season!  I'm so ready for the holidays it's ridiculous.  I've already taken down most of the pumpkins and leaves and have replaced them with pine cones and Christmas trees!  We haven't gone all the way by setting up our tree only because we get a real one.  My oldest son is trying to convince me that we should do a fake tree this year so we can set it up now…a boy after my own heart!  Even though I am in full Christmas swing, I'm still focused on gathering Thanksgiving recipes and deciding what my menu will be.  Every year we take all the food to my parents where we cook it since they no longer enjoy driving the hour and a half to my house.  It's always interesting preparing food in someone else's kitchen (where's that one spice I need!), even when it's your family.  I decided to buy pre-made gluten-free pie crust and dinner rolls this year since I'll be making all the grain-free dishes (including appetizers & desserts) from scratch.  Last year I made absolutely every single dish from scratch and I was completely exhausted.  I can't wait to take advantage of the amazing pre-made products I've been checking out!  Do you make everything from scratch, buy everything pre-made or do a combo of the two?  I'd love to hear your tips and tricks to keep Thanksgiving a stress free day.

Trisha

Tuesday, October 29, 2013

Thanksgiving Came Early!


One of my most favorite meals is Thanksgiving dinner.  I absolutely adore comfort food and all the warm memories that come with it.  I grew up eating mashed potatoes with gravy, green bean casserole with french fried onions, roast turkey, fruit salad with cool whip and flaky dinner rolls.  Top it off with pumpkin and/or apple pie and you've got a typical Thanksgiving meal for my family.  Now it's my turn to make Thanksgiving dinner and we've had to make a lot changes to the menu due to my daughter's intolerance for gluten and because my husband and I eat a mostly grain-free diet.  At first it was hard for me to let go of all the tried and true recipes I so lovingly clung to.  I nearly broke down in tears at my first attempt to make gluten-free biscuits.  I'm happy to say that I've worked out some of the major kinks to my new way of cooking and have come across some fabulous recipes.  This year I decided I might want to try and be even more dedicated to grain-free during the holidays so I can avoid the post-holiday stomach cramps.  I though it would be best if I did a dry run on some new recipes to make sure they'd make the cut.  I must admit that even the kiddos didn't have anything negative to say!


Now doesn't this look delicious?  I decided to make mashed sweet potatoes (the white ones) and didn't use a recipe.  I simply boiled them and added coconut milk, salt & pepper and a little garlic seasoning. I used rotisserie chicken from Safeway to save time.  For the gravy and "stuffing" I used some new recipes I came across.  If you're thinking of trying this, here are the ones that I used.  Let me know what you think!


~Trisha

Tuesday, October 15, 2013

A Very Merry Vintage Christmas


Ok, I know I know...it's not even Halloween and I'm already talking (and thinking) Christmas!  I simply cannot help myself this time of year.  It might be said that I get into the holiday spirit earlier than most (think Christmas music in October).  My husband gives me "the look" every time he hears it playing.  So, since I'm feelin it already I thought it only natural that I would start planning what look I want my holiday home to have.  I have a small collection of Christmas items that I've been building over the years thanks to some amazing holiday sales.  My most treasured holiday items didn't come from Target or Costco or any other store but from my parents attic.  Yep, you guessed it!  I love my hand-me-down decorations most!  I'm talking quaint Christmas villages, old time ornaments and vintage (homemade even) looking table top decor.  So without further suspense I have decided on "A Vintage Christmas"!  Since I've thoroughly exhausted my parents attic supply, I've been on the lookout for new items that would fit seamlessly into my current collection.  Here are some fun and vintage-feeling finds that will most likely find their way into my shopping basket next time I'm out.


Hope you enjoyed this little trip down holiday lane!

~Trisha

Wednesday, October 9, 2013

Favorite Store Alert!- Downtown Seattle


Let me start by saying I don't have any problems with window shopping...none.  I love nothing more that perusing stores and seeing what goodies lie within even if my cash is running low.  On a recent birthday celebration weekend with my hubby, I wandered into the store of my dreams.  No joke, I instantly told said hubby that I was ready to move in and declare it my new place.  Watson Kennedy is the name of this little downtown Seattle gem.  I must admit that my husband doesn't really enjoy shopping especially at interior decor shops.  Wouldn't you know that he actually enjoyed looking at all the unique & vintage bar ware and gift ideas for men!  This shop has something special for anyone in your life.


 Whether your shopping for some unique items to add to your current vignettes or in search of some vintage scrabble letters (you will see bowls of them throughout the store!), be prepared to find more than what's on your list. These pictures only show a tiny bit of what this shop has to offer but you get the idea that it's a pretty special place.  If you ever find yourself in the Seattle area with some time on your hands, pop over to this amazing place and you won't be disappointed. 

~Trisha

Wednesday, October 2, 2013

A Bowl Full of Comfort

Fall weather has hit the Pacific Northwest a wee bit early this year.  It felt like October weather in September, which means chilly mornings and rain...lots of rain.  I hate to admit such a thing, but I haven't even brought out my fall decorations.  They are way in the back of the brand new over-head storage in our almost re-finished garage.  Note to self: put that action item on the hubby's "to-do" list pronto!  One thing I haven't neglected is the comfort food that I dearly love to enjoy this time of year.  Besides the pumpkin cookies and pumpkin spice americanos I've been enjoying, I've been whipping up some heart warming soups for dinners.  Last night I decided to try Chicken Pot Pie soup.  Sounds yummy, right?  It was beyond delicious and everyone was asking for more after the pot had been scraped clean.  I thought I'd share it with you since it was such a hit with the whole fam.  I had to make a few substitutions due to my daughter's gluten allergy and because we are grain free.  So here we go!


Chicken Pot Pie Soup
adapted from citronlimette
Ingredients

  • 2 Tablespoons olive oil
  • 1 small onion, diced
  • 2 stalks celery, diced
  • 1 cup mushrooms, diced
  • ½ teaspoon dried thyme, crushed between fingertips
  • salt and pepper
  • 2 cloves garlic, minced
  • 3 medium carrots, cut into coins
  • 3 medium Yukon gold potatoes, peeled and cubed (use sweet potatoes for Paleo)
  • 16 oz cooked chicken breast, diced small
  • ¼ cup all-purpose flour (use arrowroot powder to make it Paleo & gluten-free)
  • 4 cups low-sodium chicken broth
  • ¾ cup frozen peas
  • 2 tablespoons fresh parsley, chopped
  • 1 cup milk (use coconut milk instead)

Instructions
  1. In a large saucepan, heat 2 Tablespoons olive oil on medium high heat. Add onion, celery, mushrooms, thyme and a dash of salt and pepper. Cook 5 minutes, stirring often, add garlic and cook another minute. Add carrots, potatoes, the cooked chicken and the flour.
  2. Stir in the chicken broth, frozen peas and parsley.
  3. Bring to a simmer and cook 25 minutes. Add more salt and pepper if needed. Stir in the milk, bring back to a simmer and cook 5-10 minutes.


Mmm, now doesn't that look comforting?  Give it a try and let me know what you think!

Trisha

Friday, September 27, 2013

Mirror, mirror...Fantastic Friday project

Hello and Happy Friday!  This week has been particularly busy for me so I thought I'd finish up a project that has been waiting in the wings.  This project happens to include two small round mirrors that I had spray painted awhile back.  I am moving them to another room in the house, so I though I'd change their color to look better in their new place.  One time consuming thing about painting mirrors that you may have already experienced, is its quite tedious to scrape paint off the mirror after the project is finished if they weren't covered properly.  Been there and done that!  It's by no means hard to scrape off but it does add another step to the project that I'd rather avoid.  So here's a simple solution to avoid scraping paint.


Start off by gathering your supplies.  Mine included the two mirrors, painters tape and a craft knife.


 Next, put one strip of tape along the edge of the mirror and push into the edge with your fingernail to make a sharp crease.  Take your craft knife and cut along the crease being careful not to snag an edge & peel up the tape.  After making your cut, carefully peel the excess tape off.


Now you have the tape exactly where you need it so you can easily paint the inside.  Continue this process until you have fully covered the mirrored surface.  In all, it only took me a few minutes start to finish.


Ta-da!  Here's the result!  Now I can move on to painting and hanging and get this project off the to-do list.  

Trisha

Thursday, September 26, 2013

Birthday Bliss


Yesterday I celebrated my birthday!  Well, actually I celebrated last weekend since my birthday happened to fall mid-week this year.  First, my wonderful hubby took me to a Lumineers concert, whom I love.  We then continued the festivities by staying overnight (kid free!) in a downtown Seattle hotel.  Lounging around, swimming, staying up late and sleeping in...pure bliss!  As if all that wasn't enough, my hubby came home from work early yesterday with gifts in hand and told me that he was cooking dinner.  Wahoo!!!  Let's just say I love to bake...anything & everything.  Cooking?  Not so much.  A girl could definitely get used to this treatment!  As soon as my kiddos got home from school, they started making drawings and pictures for my presents and then instructed me to put them on my bedside table so I can see them every morning.  I pretty much had the best birthday ever.  Gettin old doesn't seem quite so bad...

Trisha


Tuesday, September 24, 2013

Garage Re-Do: The Beginning

When we moved into our 1960's home, it was pretty much in it's original state.  The original (and only) owner had replaced carpet and kitchen counters/cabinets in the 80's but not much else.  At first we thought this was great...much better not to pay for someone else's renovations that we'd end up changing down the road anyways.  So in the case of the garage (a place you might not think of cleaning out before moving in) we just hauled all our stuff in and stored it away using whatever shelving and cabinets were already there.  Now that we've lived here almost 4years (wow how time flies!), we are starting to get really impatient with the areas of our house that are not functioning well.  The garage was quickly becoming #1 offender!  Besides the few scattered wire wall shelves we hung upon moving in, there wasn't any rhyme or reason to how or where things were stored.  So, as I was asking my husband to please create a pathway so I could maneuver through the chaos that was my garage, he decided it was time for a major overhaul.

Here's my hard working hubby beginning this huge project


We began by clearing everything out and tearing every last thing off the walls (old unfinished here & there drywall included). Down to the studs & wires we go!  Even getting it to this stage was fantastic!  A project like this also gave us the much needed motivation to clean out the excess that was building up.  Thrift store piles, Craigslist piles and garbage bags were taking over...awesome!!!


Yuck!
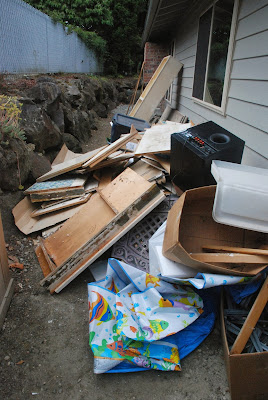
Now that's a garbage pile!

I just cannot believe how much we removed!  We were even lucky enough (ya right!) to find some miscellaneous tools stashed inside some of the drywall left from the previous owner.  So, after tearing everything out and sweeping down the walls and floors and putting all our stuff back in this was our result.
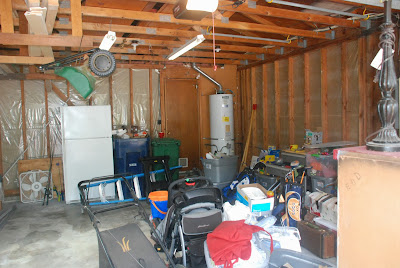
Stunning, right?!

Ok, I know it doesn't seem like a huge change, but it is a fantastic start and it actually felt much better starting from scratch.  Now I can break out all the pictures of perfectly organized garages that I've been saving up!  The list for items needed and things to do seems endless but it will be well worth it when I can not only find exactly what I'm looking for but I can also get to it without wading through junk piles

Thursday, September 19, 2013

Beef Stew & Dinner Rolls


Now that it's mid-September, I've decided to kick off the comfort food season with beef stew and dinner rolls.  We try to eat mostly Paleo round these parts and so I am constantly changing and tweaking all the yummy recipes I come across.  Recently I discovered a recipe on The Pioneer Woman's website for Sunday Night Stew.  Here is her recipe and the changes I made.

  • STEW
  • 3 Tablespoons Olive Oil
  • 1 Tablespoon Butter (use grass-fed butter for Paleo)
  • 2 pounds Beef Stew Meat (chuck Roast Cut Into Chunks)
  • Salt And Pepper
  • 1 whole Medium Onion, Diced
  • 3 cloves Garlic, Minced
  • 4 ounces, weight Tomato Paste
  • 4 cups Low Sodium Beef Stock Or Broth, More If Needed For Thinning
  • Several Dashes Worcestershire
  • 1/2 teaspoon Sugar (I used Truvia but you can also use liquid or powder Stevia if you prefer)
  • 4 whole Carrots, Peeled And Diced
  • 2 whole Turnips, Peeled And Diced (I didn't have any on hand so I just used some frozen peas)
  • 2 Tablespoons Minced Fresh Parsley
  • Mashed Potatoes (I left this out completely and used diced sweet potatoes in the stew which I added with the other veggies)
  • 5 pounds Russet Potatoes (peeled)
  • 1 package (8 Ounce) Cream Cheese, Softened
  • 1 stick Butter, Softened
  • 1/2 cup Heavy Cream
  • 1 teaspoon Seasoned Salt
  • Salt And Pepper, to taste

Preparation Instructions

Salt and pepper stew meat. Heat olive oil in a large, heavy pot over medium-high heat. Add butter, and as soon as it melts, brown half the stew meat until the outside gets nice and brown, about 2 minutes. (Turn it as it browns.) Remove the meat from the pot with a slotted spoon and put it on a plate. Add the rest of the meat to the pot and brown it, too. Remove it to the same plate. Set the meat aside.
Add the onion and garlic to the pot, stirring it to coat it in all the brown bits in the bottom of the pot. Cook for two minutes, then add the tomato paste to the pot. Stir it into the onions and let it cook for two more minutes.
Pour in the beef stock, stirring constantly. Add the Worcestershire and sugar. Add the beef back to the pot, cover the pot, and reduce the heat to low. Simmer, covered, for 1 1/2 hours to 2 hours.
After 1 1/2 to 2 hours, add the diced turnips and carrots to the pot. Stir to combine, put the lid back on the pot, and let it simmer for another 30 minutes. The sauce should be very thick, but if it seems overly so, splash in some beef broth until it thins it up enough. Feel free to add beef broth as needed!
When the carrots and turnips are tender, stir in minced parsley. Taste and add salt and pepper as needed. Serve piping hot in a bowl with mashed potatoes, letting the juice run all over everything. Sprinkle with extra minced parsley at the end.

I didn't really have to tweak much with this recipe (which I love) and it turned out beautifully!  The stew meat was really tender and moist which I find is hard to achieve with other recipes I've tried.  Now on to the really important part...the dinner roll!  I have made many Paleo biscuits and rolls but have never really found one that I love and want to make for every meal.  Well, look no more!  I have found my favorite dinner roll recipe that is gluten-free and Paleo which works for everyone in my family.  One thing I have to confess...my 9yr old son doesn't usually like my Paleo baking...sad, right?  He was so used to the taste of regular baked goods that when we switched to a gluten-free & Paleo lifestyle he had the hardest time.  He now enjoys all my gluten-free cooking & baking but still isn't excited when I pop a batch of Paleo cookies out of the oven.  So whenever I can bake something that is completely Paleo and he asks for seconds and thirds I know I've found the perfect recipe.  So, enough said...here it is!  This recipe is complements of Our Paleo Life.

Ingredients
  • 1 cup Tapioca Starch or Arrowroot Starch
  • ¼ – ⅓ cup Coconut Flour
  • 1 tsp Sea Salt
  • ½ cup Warm Water
  • ½ cup Light Olive Oil
  • 1 Large Egg, whisked
Instructions
  1. Preheat oven to 350 F.
  2. Combine the tapioca or arrowroot starch with the salt and ¼ cup of the coconut flour in a medium bowl. Mix well.
  3. Pour in the olive oil and warm water and stir until combined. The mixture will be very thick. Add the whisked egg and continue mixing until well combined. Now the dough will be thinner.
  4. If the mixture is too thin you should add one or two more tablespoons of coconut flour – one tablespoon at a time – until the mixture is a soft but somewhat sticky dough. No more than 3 additional tablespoons should be used.
  5. Using a small scoop, make balls of dough and place on a parchment-lined baking pan, about 2 inches apart.
  6. Bake for 20 minutes. If you are making your rolls larger than 1 Tbsp each, bake longer.
  7. When the bottoms are lightly brown, but the tops are not, remove from the oven.
  8. Promptly remove from the baking pan and place in a tea towel lined bowl. Serve warm.


And there you have it!  Delicious, crunchy on the outside and soft on the inside dinner rolls...yum!

Trisha